Introduction
Sound engineers are the unsung heroes of music production. While artists and producers create the music, sound engineers refine and perfect it, ensuring that every note, beat, and vocal is captured with clarity and precision. Whether you’re recording vocals, mixing a track, or preparing an album for distribution, a skilled sound engineer can make the difference between an amateur-sounding demo and a chart-ready hit.
But what exactly does a sound engineer do? And why is their role crucial to your success as an artist or producer? This guide will break down the responsibilities of a sound engineer, the different types of engineers in the industry, and why hiring a professional can elevate your music to the next level.
1. What is a Sound Engineer?
A sound engineer is responsible for the technical aspects of music production, including recording, mixing, and mastering audio. Their job is to ensure that every element of a song sounds balanced, professional, and ready for release.
Key Responsibilities of a Sound Engineer:
✔ Setting up microphones and equipment for optimal recording quality.
✔ Adjusting EQ, compression, and effects to refine each sound.
✔ Managing signal flow and levels to prevent distortion.
✔ Balancing instruments, vocals, and background elements.
✔ Enhancing the final mix with automation, panning, and stereo imaging.
✔ Mastering the track to meet industry loudness and clarity standards.
Without an experienced sound engineer, even the best performance can fall flat due to poor audio capture, imbalance, or technical flaws.
2. Different Types of Sound Engineers
The term “sound engineer” actually covers several different roles, each specializing in a unique aspect of audio production. Understanding these roles helps you determine which type of engineer you need for your project.
Recording Engineer (Tracking Engineer)
Focuses on capturing high-quality recordings of instruments and vocals.
Selects and places microphones for optimal sound capture.
Works closely with artists to ensure clean takes.
Mixing Engineer
Balances all the elements in a track to create a cohesive and dynamic mix.
Adjusts volume, EQ, compression, and effects for each instrument.
Uses panning and stereo width to give the track depth and clarity.
Mastering Engineer
Prepares the final mix for distribution and streaming.
Ensures the track is loudness-optimized for platforms like Spotify, Apple Music, and radio.
Applies final EQ, limiting, and stereo enhancement for professional sound.
Live Sound Engineer
Handles audio during live performances and concerts.
Manages front-of-house (FOH) and monitor mixes for artists.
Prevents feedback issues and ensures consistent sound for the audience.
If you’re recording a song, a recording engineer and mixing engineer are essential. If you’re releasing music commercially, a mastering engineer ensures your track meets industry standards.
3. Why You Need a Professional Sound Engineer
Many artists attempt to mix and master their own music, but this often leads to poor results. A trained sound engineer has the experience, tools, and knowledge to enhance your music in ways that DIY production often fails to achieve.
1. They Bring Technical Expertise
✔ Engineers understand frequency balance, dynamics, and headroom management.
✔ They can fix common issues like muddiness, clipping, or phase cancellation.
✔ They know how to apply effects properly without overprocessing.
2. They Save You Time
✔ DIY mixing and mastering can take weeks to perfect.
✔ A professional engineer can quickly achieve a polished sound.
✔ They already know how to navigate industry-standard software and hardware.
3. They Ensure Your Music Competes at a Commercial Level
✔ Mixing and mastering determine how your song stacks up against industry releases.
✔ A professionally engineered track sounds clear, balanced, and dynamic.
✔ Without proper engineering, your song may not translate well across different speakers and streaming services.
4. Essential Tools Used by Sound Engineers
Professional engineers use a combination of hardware and software to achieve high-quality results.
Software & Plugins:
✔ Pro Tools, Logic Pro X, Ableton Live – DAWs for recording and mixing.
✔ FabFilter Pro-Q3, Waves SSL EQ – For shaping sound frequencies.
✔ Universal Audio LA-2A, Waves CLA-76 – Compression for vocal and instrument control.
✔ iZotope Ozone, Waves L2 Limiter – For professional mastering and loudness optimization.
Hardware & Outboard Gear:
✔ Analog Mixing Consoles – SSL, Neve, API for a warm, organic sound.
✔ Microphones – Neumann U87, AKG C414, Shure SM7B for high-quality recordings.
✔ Monitor Speakers – Yamaha HS8, Genelec 8030, KRK V8 for precise mixing.
Having access to these tools—combined with expert knowledge—ensures your music sounds as professional as possible.
5. How to Work Effectively with a Sound Engineer
If you’re working with a professional engineer, collaboration is key. Here’s how to get the best results from your session.
Before the Session:
✔ Provide reference tracks that showcase your desired sound.
✔ Communicate your vision and artistic direction clearly.
✔ Be prepared—rehearse your parts and have all files organized.
During the Session:
✔ Be open to the engineer’s feedback and suggestions.
✔ Perform with confidence and consistency.
✔ Allow time for multiple takes and adjustments.
After the Session:
✔ Review the mix on different speakers and headphones.
✔ Give constructive feedback for revisions.
✔ Trust the engineer’s expertise—avoid unnecessary over-tweaking.
Final Thoughts
A sound engineer is one of the most valuable assets in music production. They take your creative ideas and refine them into a professional, polished track that sounds great on all platforms and devices.
At Krafthouse, our expert engineers specialize in recording, mixing, and mastering to help artists achieve the best possible sound quality.
️ Looking for a professional engineer for your next project? Book a session today and take your music to the next level!
Introduction
Stepping into a recording studio for the first time—or even the tenth time—can be both exciting and intimidating. The studio is where raw ideas are transformed into polished tracks, but without proper preparation, valuable time and money can be wasted.
Many artists and producers make the mistake of showing up unprepared, leading to rushed performances, technical issues, and unsatisfactory results. Whether you’re a vocalist, instrumentalist, or producer, being studio-ready is essential to getting the best recordings possible.
This guide will cover everything you need to properly prepare for a studio recording session, ensuring you walk away with high-quality, professional results.
1. Know Your Music Inside and Out
One of the biggest mistakes artists make is not fully knowing their material before heading into the studio. If you’re still figuring out lyrics, melodies, or arrangements during the session, you’re wasting valuable recording time.
How to Prepare:
✔ Memorize your lyrics and parts before the session.
✔ Practice with a metronome to maintain timing.
✔ Record yourself at home for self-feedback.
✔ Rehearse with your band (if applicable) to ensure tight performance.
✔ Finalize song structures—don’t change arrangements on the spot.
2. Prepare Your Instrument and Gear
Nothing derails a recording session faster than technical issues with instruments or gear. If you’re bringing your own equipment, make sure it’s in top condition.
For Vocalists:
✔ Stay hydrated – avoid dairy, caffeine, and alcohol before recording.
✔ Warm up your voice with vocal exercises.
✔ Bring your own pop filter if you prefer a specific one.
✔ Avoid screaming or straining your voice the night before.
For Guitarists & Bassists:
✔ Restring guitars a day before so they stay in tune.
✔ Check for any buzzing frets or unwanted noises.
✔ Bring extra strings, picks, and cables.
✔ Tune your guitar properly before every take.
For Drummers:
✔ Replace old drum heads to get a fresh sound.
✔ Bring extra sticks and dampeners.
✔ Ensure hardware is secure and adjust drum tuning beforehand.
For Producers & Beatmakers:
✔ Export all stems and session files in the correct format.
✔ Bring a backup of all files on a USB or external hard drive.
✔ Ensure your DAW project is organized before the session starts.
3. Communicate with the Studio and Engineer
A successful studio session requires teamwork. Your engineer needs to know your vision so they can help bring your sound to life.
What to Communicate Before the Session:
✔ Send your demo/reference tracks in advance.
✔ Discuss your preferred recording techniques and sound.
✔ Clarify if you need autotune, effects, or special processing.
✔ Confirm file formats, sample rates, and export settings.
✔ Let them know if you’re bringing session musicians or guests.
A simple email or call before your session avoids confusion and ensures a smooth workflow.
4. Be Punctual and Professional
Studio time is paid by the hour, and running late can eat into your recording time. It’s essential to arrive on time, prepared, and with a professional attitude.
Best Practices:
✔ Arrive at least 15 minutes early.
✔ Have your gear set up quickly and efficiently.
✔ Be respectful to the studio staff and engineer.
✔ Follow studio etiquette – no unnecessary noise or distractions.
✔ Stay focused – avoid excessive breaks and distractions.
5. Take Care of Your Health Before the Session
Your physical and mental state directly affects your performance. Being well-rested, hydrated, and relaxed will help you deliver your best take.
Health Tips for Artists:
✔ Get at least 7-8 hours of sleep the night before.
✔ Eat a balanced meal before heading to the studio.
✔ Stay hydrated – bring a bottle of water.
✔ Avoid caffeine, dairy, and alcohol, as they affect vocal cords.
✔ Warm up your body – light stretches help reduce tension.
6. Manage Your Expectations
Many artists assume they’ll nail everything in one take, but that’s rarely the case.
What to Keep in Mind:
✔ It’s normal to do multiple takes – even professionals do.
✔ Be patient with the process – great recordings take time.
✔ Trust the engineer’s guidance.
✔ Focus on performance quality rather than just getting through the session.
✔ If something isn’t working, don’t force it – try a different approach.
7. Bring Essentials for a Smooth Session
A few small items can make a huge difference in your comfort and performance.
Checklist for Recording Sessions:
✔ USB drive/external hard drive for file backups.
✔ Notebook and pen for lyric adjustments or notes.
✔ Phone charger – you may need to reference voice memos.
✔ Comfortable clothing – studio sessions can be long.
✔ Snacks – avoid anything that will affect your voice.
✔ Water – staying hydrated is key.
8. Be Open to Experimentation
Recording sessions are creative environments, and sometimes the best takes come from unexpected moments. Be open to suggestions from the engineer or producer.
Try These for a Unique Sound:
✔ Experiment with different mic placements.
✔ Record multiple vocal takes and layer them.
✔ Try harmonies, ad-libs, or vocal doubles.
✔ Use the studio’s analog gear for a warmer tone.
✔ Take creative risks – sometimes, an unplanned idea becomes the highlight of a song.
Final Thoughts
A successful studio recording session is about preparation, professionalism, and performance. Whether it’s your first time in the studio or you’re an experienced musician, following these steps will save time, reduce stress, and result in a polished, professional recording.
At Krafthouse, we provide a world-class recording environment with expert engineers who guide artists through the process to capture their best performances.
️ Want a stress-free recording experience? Book a session today and let’s create something amazing!
The debate between analog and digital recording has been ongoing for decades, with strong opinions on both sides. Some artists and engineers swear by the warmth and depth of analog recordings, while others embrace the precision, flexibility, and efficiency of digital technology. Choosing between the two depends on your artistic vision, workflow, and the kind of sound you want to achieve. Understanding the strengths and limitations of both can help you make an informed decision that aligns with your music.
Analog recording is often associated with classic recordings from the golden age of music. It involves capturing sound on magnetic tape, using hardware like reel-to-reel machines, analog mixing consoles, and outboard gear such as compressors and equalizers. The biggest advantage of analog is the natural warmth and harmonic saturation it imparts to recordings. The way analog tape slightly compresses transients and adds subtle distortion can create a rich, immersive depth that digital recordings sometimes lack. Many engineers and musicians love how analog equipment interacts with sound, shaping its tone in a way that feels more organic and musical.
However, working with analog can be expensive and time-consuming. Tape machines require regular maintenance, and high-quality tape reels can be costly. Unlike digital, where multiple takes and edits can be done instantly, analog recording demands precision and planning. Punching in corrections is possible but requires skill, and excessive re-recording can degrade the tape’s quality over time. Analog also has physical limitations—there’s a finite number of tracks available on a tape reel, which forces musicians to commit to decisions earlier in the process rather than relying on post-production to fix mistakes.
Digital recording, on the other hand, revolutionized music production by offering virtually unlimited flexibility. Using digital audio workstations (DAWs) like Pro Tools, Logic Pro, and Ableton Live, artists can record, edit, and mix music with an ease that was unimaginable in the analog era. The ability to work with hundreds of tracks, apply instant effects, and correct timing or pitch issues has made digital the go-to choice for modern music production. Digital recording provides a cleaner sound with a wider dynamic range, free from the noise and imperfections associated with analog tape. This clarity is particularly beneficial in genres that require precision, such as electronic music, pop, and modern hip-hop.
Despite its advantages, digital recording has its critics. Some argue that digital recordings can sound sterile or lifeless compared to analog, lacking the subtle imperfections that give music a human touch. While digital emulations of analog gear have come a long way, purists argue that plugins and digital processing can never fully replicate the character of true analog circuits. Additionally, the ability to endlessly tweak performances and edit tracks can sometimes lead to overproduced music, where the raw energy of a performance is lost in excessive refinement.
Choosing between analog and digital ultimately depends on the artistic vision of the project. If you want a classic, warm, vintage sound and don’t mind committing to performances early in the process, analog might be the right choice. Studios equipped with analog tape machines, classic consoles, and outboard gear can provide a unique character that is difficult to replicate in a digital setting. However, if you need the convenience of working with an unlimited number of tracks, extensive editing capabilities, and a faster workflow, digital recording is likely the better option. The flexibility of digital allows for greater experimentation and fine-tuning, making it ideal for producers who like to craft their songs meticulously.
Many modern studios combine the best of both worlds, using analog gear for tracking and processing, then transferring recordings into a digital DAW for editing and mixing. This hybrid approach gives artists the warmth of analog with the flexibility of digital, striking a balance that leverages the strengths of both formats. Whether you choose analog, digital, or a mix of both, understanding the differences can help you make the right choice for your sound and workflow.

Recording in a professional studio is an exciting experience, but making mistakes can cost time and money. Here are five common mistakes artists make and how to avoid them.
1. Not Being Prepared
Know your lyrics, rehearse your parts, and have all necessary files ready before stepping into the studio.
2. Overcomplicating Arrangements
Adding too many elements to a track can make it sound cluttered. Stick to the essentials.
3. Ignoring the Engineer’s Advice
Engineers have years of experience and can offer valuable guidance. Trust their expertise.
4. Poor Microphone Technique
Standing too close or too far from the mic can affect recording quality. Work with your engineer to find the best position.
5. Rushing the Mixing Process
Mixing takes time to get right. Don’t rush the process; allow the engineer to fine-tune the track.
At Krafthouse, we guide artists through every step of the recording process to ensure they get the best results. Book your session today!
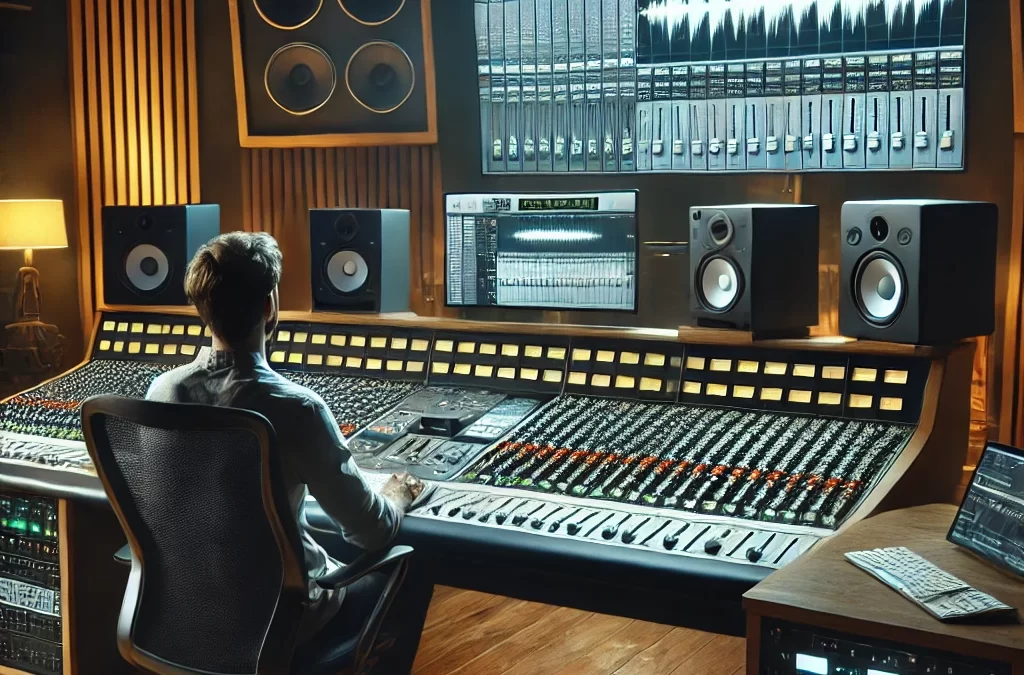

Mixing at studio London
Mixing and mastering are essential processes that transform raw recordings into polished, professional-quality music. Understanding the difference between the two and knowing best practices can help you achieve a radio-ready sound.
What is Mixing?
Mixing is the process of balancing all the elements in a song. This includes adjusting volume levels, applying equalization (EQ), compression, reverb, and panning.
What is Mastering?
Mastering is the final step that ensures your track is sonically consistent across different playback devices. It involves final EQ adjustments, stereo enhancement, and loudness optimization.
Essential Mixing Techniques
– Use reference tracks to compare your mix with professional songs.
– Apply EQ to remove unwanted frequencies and create clarity.
– Control dynamics with compression to balance volume levels.
– Pan instruments for a wider stereo field and depth.
Mastering Best Practices
– Avoid over-compression, which can squash the dynamics.
– Optimize loudness for streaming platforms like Spotify and Apple Music.
– Apply stereo widening carefully to maintain clarity.
At Krafthouse, we offer professional mixing and mastering services that ensure your tracks meet industry standards. Book your session today!